Monday, October 22, 2012

Petroleum Free Vapor Chest Rub


It's that time of year. With everyone back in school and temperatures wavering between hot and cold, runny noses and coughs abound. My little one has had ongoing congestion and a cold that has hung on for some time. He had a night time cough that was keeping him up, but I didn't want to use the traditional drug store chest rub on him. The smell is too strong and the ingredients less than ideal. So I whipped up a batch of homemade, petroleum free chest rub for him and he slept like a little baby.

The rub only requires three ingredients and smells so much nicer than the standard vapor rub. The coconut oil base is also a great nourishing moisturizer for the skin. Since the rub has a less overbearing smell, you may have to reapply after a few hours. But it is well worth knowing what ingredients you are smearing on your kid's skin.

*Do not use in children younger than 2 years old.

Coconut Oil Chest Rub

1/4 c. organic virgin coconut oil
20 drops eucalyptus oil
10 drops lavender oil

Mix thoroughly in a resealable glass jar. Apply under nose, on chest and back, rub a little on your temples, or on the bottoms of your feet to relieve a cough. For ease in applying, allow to re solidify by placing in a cool area of your home.

I like the lavender because it is a sleep aid. You could also add about 20 drops peppermint oil to ease congestion as well.

Wednesday, October 10, 2012

Fall is Pumpkin Time! Some of My Favorite Pumpkin Related Pins

One thing I miss here in South Texas is those crisp nights of bonfires and hot cider and the bold yellows, oranges, and reds that take over the landscape. I love fall and I especially love all things pumpkin. In celebration of the "the great pumpkin" I have listed my favorite Pinterest pins. I'll let you know if I get to try 'em out. It seems like my energy is waning like the daylight hours lately. I haven't even taken pics of the cool Halloween decorations me and the little one put up last weekend.

This one I just have to try! I love Starbuck's pumpkin spice latte but it is too darn expensive for this single momma to indulge in as often as I would like.


Source: facebook.com via Gina on Pinterest


Pumpkins and cream cheese, oh my!


Pumpkin French Toast. Say yes to breakfast!


Pumpkin Patch Cupcakes. These would be so cute for a fall birthday!


Source: pinerly.com via Gina on Pinterest


And finally fall would just not be the same without Charlie Brown and the gang.


Sunday, September 30, 2012

Pumpkin Pancakes with Hot Cider Sauce


I have been making these pancakes since 1993. When I did the math and realized that meant I had been making them for 19 years I felt kind of, well, old. I discovered the recipe in a Better Homes and Gardens Holiday Celebrations Magazine. Around here they are  known as pumcakes, as my oldest son affectionately named them. For an extra treat serve them with the hot cider sauce. You won't be disappointed.

Pumpkin Pancakes

1 C. all purpose flour
1 tbsp sugar
2 tsp. baking powder
1/2 tsp salt
1/2 tsp ground cinnamon
1 C milk
1/2 C canned pumpkin
2 slightly beaten egg yolks
2 tbsp canola oil or coconut oil
2 egg whites

Combine flour, sugar, baking powder, salt, and cinnamon in a large mixing bowl. In a separate bowl combine milk, pumpkin, egg yolks, and oil. Add pumpkin mixture to flour mixture and stir until just blended.

Beat egg whites until stiff peaks form. Gently fold into pumpkin mixture.

Cook on hot lightly greased  skillet or griddle until bubbly. Turn and cook until lightly brown on both sides.

Hot Cider Sauce

3/4 C apple cider or apple juice
1/2 C packed brown sugar
1/2 C light corn syrup
2 tbsp butter
1/2 tsp lemon juice
1/8 tsp cinnamon
1/8 tsp nutmeg

Combine all ingredients in a medium saucepan. Cook and stir over medium heat until sugar dissolves and mixture is bubbly. Simmer about 20 minutes or until reduced to 1 cup. Let stand 30 minutes before serving to thicken.

Monday, September 24, 2012

Natural Cold/Sinus Relief

Me and the little one have been battling one illness after another this month. We both started off with a stomach virus and we are ending the moth with sinus congestion and a cold. Not affording any downtime, and frustrated at feeling lousy for so long, I've brought out my Neti pot again. The Neti pot is a bit of an experiment with me. I want it to work but I usually end up setting it aside because my nasal passages burn too much when I use it. I have chronically inflamed sinuses and that could be the reason it has been too uncomfortable in the past.

If you are not familiar with the Neti pot, it is a nasal washing system originating from the Ayurvedic yoga tradition of India. A solution of clean water and salt is passed through one side of the nose and out the other, washing away pollen, dust, and other impurities. The temperature of the water and the amount of salt must be just right. You can purchase salt packets for use in the pots at most health food stores. Tap water should be avoided because it usually contains a whole host of chemicals and microorganisms you don't want invading your body. Use sterile lukewarm water.

This time around has brought more success so far. The first time there was some pain in one nostril, but I certainly cleared a lot of gunk. The instructions on the box of salt said you could mix in two pouches of salt, so I tried it the second time with more salt but felt buring in both sides. So this morning I went back to using one packet and got the water a touch warmer that before. There was absolutely no burning and my sinuses felt relief from the irritation for a bit.

Another thing I have been using is a capsicum nasal spray. When I first heard about this I though you gotta be nuts! And I have to admit for about two seconds it does seem nuts because right after you use this spray there will be an uncomfortable sting, which is what one would expect from shooting hot pepper juice up ones nose. But a couple mornings ago when I was so clogged up nothing was moving, this got things cleared and moving again and it is all natural.

After many days of blowing my nose, I am beginning to have that Rudolph reindeer look. I have discovered that coconut oil works great to sooth the inflamed skin. I love coconut oil. It has become a pantry staple. I just wish the good quality stuff wasn't so darn expensive.


Monday, September 3, 2012

Meatloaf: My Childhood Comfort Food

One thing that has always been really important to me is family dinners. When it is just the two of us, myself and little one, it is really easy to just pull up to the counter and eat sandwiches for dinner. However, the last couple of nights I have made the extra effort to cook a nice dinner and once again provide a family meal for two. Last night it was tilapia, brown rice, and fried zucchini rounds. Tonight I opted for old fashioned comfort food; my momma's meatloaf (so much for vegetarian), served with parsley potatoes and oven baked Parmesan zucchini halves.

Our home cooked meals are especially celebratory because we just got over a bout with a stomach virus. We have been eating buttered toast all week.

I even set the table all nice and pretty:


 ...and momma poured herself a glass of wine.


My meatloaf recipe is a little bit of this and a pinch of that, but I'll do my best to share it with you.

Starting with about a pound and a half ground beef, mix in one egg, two minced garlic cloves, about a third of a chopped onion, about a half teaspoon of sage (no more), one cup of seasoned bread crumbs, and about a half cup of ketchup. Most recipes call for either Worcestershire sauce or steak sauce. I had neither so added two tablespoons Braggs Liquid Amino, a substitute for soy sauce. Dig both hands in and mix thoroughly. That's the best way to mix meatloaf. Form into loaf and place on broiler pan to avoid a greasy loaf. Bake at 350 degrees F until brown. Mix up about a fourth cup of ketchup with a little sweetener of your choice. My momma always used brown sugar, but I have also used honey and tonight I used agave nectar. You just want a touch of sweetness, not a sugary mess. Top the meat loaf with ketchup mixture and return to oven. Continue baking until ketchup forms a thick coating on loaf.

A nonconventional recipe format, but my dinner date found it to be quite yummy.


Saturday, August 11, 2012

Thoughts on Sustainable Living


I have had this post floating around in my head for a couple weeks now. It is less of an informative post and more of me thinking out loud. Feel free to hop in and add your thoughts. This post stems from having my choices questioned concerning the path I have taken since becoming  a single parent. I am blessed with some very good friends who get it, who completely understand because they have chosen a similar path or are struggling with taking that first step. I have some very heavy questions as a result of that questioning. What is a sustainable economy, especially for a family? Why is choosing not to have a traditional job seen as taking an oath to poverty and an irresponsible act? Why is society's definition of poverty solely based on income?

I realize that for statisticians purposes, basing poverty on income makes it easier to quantify what is a serious problem in America and across the world, but shouldn't there be a broader definition within society? It is possible, when choosing to live a simplified life to not earn a lot of money and not feel poor. If I chose to live in a tiny house and grow most of my own food, hang my clothes on the line instead of use my energy sucking dryer, buy my clothes from garage sales and second hand stores, am I really still deemed poor by society because I earn very little? I could have chosen to walk into another low paying job while the little one spent most of his time in daycare, but I see my greatest commodity as my time and I would much rather spend it with those I love, even if it means I am barely eking out a living through a patchwork of writing, photography, and teaching jobs. Even if it means not having the American dream, because it is not my dream.

Believe me, I have tried to get another low paying job. As a degree holder, I even applied for a host of jobs that by society's definition, I would be making a living wage. Nothing, nada. Not one single bite on the hook. The job market is just too crumby. If ya don't know somebody you aren't going to get hired, especially if you are walking into middle age after being out of the job market for a while and have no skilled trade. Time to get creative, and creative I've been, patching together income from everything from my writing and photography to dog sitting and holding  a whopper of a yard sale. Nontraditional, yes. But it has allowed me to spend more time with my boys.

A sustainable economy is simply being able to live within your means without taxing your resources financially or environmentally. If you are spending beyond your means (no matter your income) or are using up natural resources faster than they can be regenerated and stripping them from the earth in a damaging way, you are not living in a sustainable economy. It doesn't matter if it is just within your family or in the broader scope of our planetary community. If you earn enough to meet your basic needs and do not overspend, if you are respecting your environmental resources, if you chose to live a simpler life because it affords you greater happiness and more time with your loved ones, you are not only living a sustainable economic model, you are also wealthy in riches far greater than the guy in the big house who spends his life working to pay off the mortgage and two car loans. I have news for that guy. NONE OF THAT STUFF MATTERS!!!! It is just stuff. Stuff we don't need for our well being. Let it go.Get off the deadly treadmill.

I chose to live a more simple life, to raise my boys without the insatiable drive to succeed by American standards at all costs. If this is poverty by the American definition, then so be it. I chose poverty. But what I really think needs to happen is for America to redefine poverty and success. The current definition of success isn't sustainable.


Thursday, August 9, 2012

A Tiny House for A Tiny Life

I have been absent for a while in order to gain my bearings after some not so great changes to my family that were out of my control. When your world is out of kilter, you either let it knock you down or you fight back and make a plan. After eating a quart of Ben & Jerry's Chocolate Therapy and lots of hugs from some very good friends, I have formulated a plan.

I have become fascinated with the tiny house movement. Born from this fascination is a desire to build my own tiny home. I am looking at a living space of 400-875 square feet for me and the boys. We don't need much space. The hard part will be saving up to buy the land to build it on. I'm looking at maybe an acre of land southeast of town, somewhere I can keep some chickens, put in some raised bed vegetable gardens, and live a sustainable life with my boys. In time, maybe I can build a tiny studio for my photography as well.

Here are some of my favorite tiny house designs:

The Betty Lu Lu, by Goodfit Cottages and Small Houses, is by far my favorite design so far. The layout is great and the design is just super cute and cozy. You could still have guests over and not feel like they were invading your bedroom. It has a small footprint of 875 square feet, two bedrooms (bunk beds, boys?), one bathroom, a great room, dining alcove, and a tiny laundry room. Just a perfect little house. And the little porch out front, I so can picture myself curled up with a good book and a glass of iced tea while sitting out on that little porch.


At 404 square feet this tiny house, by Tumbleweed Tiny Houses, makes the Betty Lu Lu look like a mansion. It is a sweet little house with a sleeping loft and the option of a bedroom extension. If I am going for a smaller footprint, this just might be the one for me and the boys.


This little number is the work of Tiny Texas Houses. The houses are built using reclaimed building supplies and green building techniques. I am hoping to get out to Luling, Texas to visit Tiny Texas Houses soon. While I am leaning toward more of a cottage design, this tiny house looks like it walked right out of a Texas history book. I am also loving the idea of building my tiny house out of reclaimed/salvaged building supplies.

I am already thinking along the lines of tiny house living and have begun to look around at all of the things that I would need to get rid of to live the tiny house lifestyle. Oh, baby, am I ready to downsize! The hardest will be getting rid of books and getting the boys to let go of some of their stuff. Maybe I can use the money from the sale of some of this stuff to put toward saving for a little plot of land. I really see this as the best way for me to own a home someday while maintaining a simple, sustainable lifestyle.

Monday, July 30, 2012

Book Review: Bringing It To The Table: On Farming and Food


Wendell Berry is one of my favorite writers, as well as someone who I look up to. If I could sit down to dinner with any one person living today, it would either be the Dali Lama or Wendell Berry. I own several of Berry's books of poetry and essays, but this is one that I have overlooked until now. I was researching organic gardening at the library yesterday when I ran across Bringing It To The Table: On Farming and Food in the library collection. Again, Mr. Berry impresses me with his wisdom, this time about our modern food system and what is wrong with it.

Anyone interested in sustainable farming and the future of our food system (which should be everybody) needs to read this impressive book. In fact, I think it should be required reading in high school agriculture programs and agriculture colleges. While many of these issues are just now becoming widely discussed, Berry has been talking about these issues for years and sadly few were listening. His very profound essay, Agriculture Solutions for Agriculture Problems, talks about the problems with factory farming and industrial agriculture. He describes the system as a failure and outlines its weaknesses in a dependency on chemical fertilizers, an economic and industrial organization, and an absolute dependence of most of the population on this organization with no back up system. In other words, if the system fails the general population will have no knowledge or land to grow their own food. He originally published this article in 1978, yet our society is only now taking note of these problems.

Wendell Berry
The book is divided into three sections: farming, farmers, and food. He defends the traditional family farm and condemns factory farming. He tells the stories of old school farmers Lancie Clippinger and Elmer Lapp, as well as many others affected by the dominance of the factory farm. The book ends with the essay, The Pleasures of Eating. Here he talks about the disconnect between the consumer and the food he eats. He discusses the politics and ethics of food and eating and outlines seven things anyone can do to eat responsibly, including preparing your own food and buying locally. While many of us who are aware of the problems of our industrial agriculture system have heard these seven actions before, the general population still blindly consumes the food on their grocery shelves.All you have to do is visit your local grocery chain and glance into the carts of the people filing back and forth down the isles grabbing items simply because they want them, not because they are good for them. Carts filled with overly processed foods, foods grown in large mono crops fed diets of chemical fertilizers and dusted in harmful pesticides.

It is time, for our own health and the health of our food system, that we finally start listening to Wendell Berry.


Tuesday, July 10, 2012

Lemon Verbena Scones with Lemon Cream


I am in love. On Monday I picked up a few pots of herbs that someone was giving away on one of those freecycle groups. One of them happened to be a big, healthy lemon verbena bush. If you have never smelled lemon verbena before, its aroma is like a sweet lemon with a floral note. Similar to lemongrass, but more intense. Within an hour of settling it into its new home on my patio, I had the scissors out trimming it back with the plans of using the leaves for...uh, something. I didn't really know, but a Google search set me straight on that. I never realized there were so many recipes that use lemon balm in them; baked goods, cheesecake, jelly, pesto, beverages. Plus, it has many healing properties including aiding in soothing digestive problems and for relieving depression. I am sure I will be posting about this wonderful multipurpose herb again in the near future.

The recipe that caught my eye was for scones. I love scones. They are so easy to make and are a great breakfast with a cup of coffee. I decided these needed dressed up a bit, so I whipped up some lemon cream to go with them. The more lemony goodness, the better. Next time I make these I think I am going to make one little change to the recipe by adding maybe a tablespoon of fresh squeezed lemon juice into the batter. They are chewy with the addition of the oats, so if you like light and fluffy better these might not be for you, but I found them to be scrumptious. I could almost imagine myself having afternoon tea with the queen.

Lemon Verbena Scones with Lemon Cream

Scones:
2 cups unbleached flour
1 1/2 cups rolled oats
2 tsp baking powder
1/2 tsp baking soda
1/2 tsp salt
1/4 cup brown sugar
1/4 cup cold butter
1/4 cup finely chopped lemon verbena
1 egg, beaten
1/2 cup plain yogurt
1/4 cup milk

Preheat oven to 425 degrees F. In a large bowl, mix together flour, oats, baking powder, baking soda, salt, and brown sugar. Cut in the butter with a pastry cutter or your fingers until mixture resembles course crumbs. Add in the lemon verbena and mix. Make a well in the middle of the flour mixture and add wet ingredients, stirring well. Mix in well with the flour mixture to form a soft dough. Lightly grease a 12 inch cast iron skillet. Pat the dough into the skillet. Flour hands if dough is sticky. Cut into eight wedges using a serrated knife. Bake for 15 minutes or until lightly brown. Serve warm with lemon cream (recipe below).


Lemon Cream:
1/2 cup softened cream cheese
juice from 1/2 of a fresh lemon
honey to taste

Whip honey and lemon juice together. Add honey until desired consistency and sweetness is reached. I used about 1 tablespoon.

Monday, July 9, 2012

Preserving Your Bounty of Fresh Basil

I am just a little behind on blogging here at the Hippy Homemaker because I took some time off to focus on spending time with the boys before the oldest headed off for his summer visit with dad in good ole' Kentucky. It sure would be a lot simpler if we lived closer, but for now we live about 20 hours away. Because of this, my son has more flier miles than I will ever have. I am always putting him on a plane. I can't remember the last time I flew, but although Kentucky is beautiful country, I must confess I'd rather fly somewhere with mountains and/or ocean beaches.

Mr. Frequent Flier. Meanwhile, I am a little behind on my garden too. I have an abundance of fresh basil I don't feel like I am using fast enough, especially now that it is just me and the little one. I decided I needed to preserve some of this summer goodness for the bleak winter, which in San Antonio consists of one long dreary month where we complain about the cold and feel guilty doing so when we hear about the weather from our neighbors in the north.

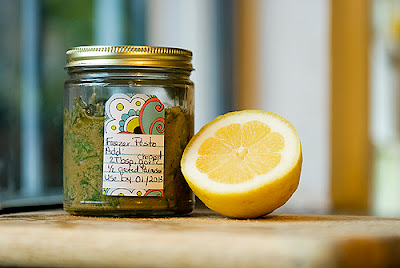
I have always just tied bundles of basil together and hung them upside down to dry in the late summer heat. This year I am freezing it two ways; as a puree in oil and slightly changed up for pesto. For the strait basil and oil puree, wash and dry a big bunch of leaves. Fill up your food processor bowl and pulse until leaves are finely chopped. Add 1-2 teaspoons olive oil and continue pulsing until oil is evenly distributed. To freeze, either put in plastic freezer bags and lay flat in freezer or freeze by the tablespoon in ice cube trays and transfer to freezer containers.


Freezer Pesto

1/3 cup pine nuts
2 cups firmly packed basil leaves
1 Tbsp freshly squeezed lemon juice
1/2 cup extra virgin olive oil

Place nuts in a food processor and pulse 2 or 3 times. Add basil and pulse a few more times. Repeat step with lemon juice. While running the food processor, add olive oil a little at a time. Scrape down sides and process until pureed. Place mixture into a quart sized freezer bag and seal bag, pressing out excess air. Freeze lying flat. 
*note -  I didn't have any freezer bags and I am in the process of switching from plastic to glass, so I froze mine in a small glass jar. 

When ready to use add:
2 Tbsp chopped fresh garlic
1/2 cup freshly grated Parmesan cheese
If desired, 1 Tbsp freshly squeezed lemon juice

Puree into thawed basil mixture. Season to taste with salt and black pepper.

Saturday, June 23, 2012

Authentic Pesto

One thing that is always a staple in my garden is basil. When my tomatoes wilt under the hot Texas sun and I become disenchanted with gardening in such harsh conditions once again (it is a seasonal disorder with me), I can always count on my basil. I usually plant way more than I can use. Making homemade pesto is one of those "have to" summer activities, but it has taken me a while to get around to making a batch this year. The boys and I got invited to a potluck yesterday, so I finally made my way out to the garden to pick a handful of the fragrant herb and mix up a batch of fresh pesto to serve with some chewy garlic sourdough bread. There was no pesto left to take home at the end of the night, a pleasing compliment to the chef.

I couldn't find the pesto recipe I usually work from, so I turned to one of my favorite food blogs, 101 Cookbooks. The process of making authentic pesto involves a lot of chopping. I must confess I don't own a single good knife. When I moved in with my husband, he owned a good set of knives. He took them with him when he moved out. Nough said. My single knife is a $3 bargain that I picked up after he left from, ugh, yeah...Walmart. Yes, that is my El Cheapo knife in the photo below. I chopped and chopped the best I could and here I hang my head in shame, unable to look all the Italian grandmothers in the eye. I resorted to my little food processor to finish the chopping. You just gotta work with what you have. It still tasted delicious.


Pesto

1 large bunch of basil, leaves only, washed and dried
3 medium cloves of garlic
one small handful of raw pine nuts
roughly 3/4 cup Parmesan, loosely packed and FRESHLY GRATED
A few tablespoons of extra-virgin olive oil

Start by chopping the garlic, then add in the basil leaves in small bunches and continue chopping. Once you have the basil and garlic chopped fairly consistently, add in the pine nuts and chop some more.  Here is where I resorted to the food processor. Add all the chopped ingredients into the food processor with the Parmesan cheese. Pulse until all ingredients are chopped. Do not over process. You want it to remain fairly course, not a fine paste. Scrape into small bowl and add olive oil. I used about 4 tablespoons to get the desired consistency I wanted.

For more detailed directions on how to make pesto like an Italian grandma, visit 101 Cookbooks. No food processors, but plenty of sharp knives.

Monday, June 18, 2012

Alphabet Activity and Tofu Cheese Fail


First, for the tofu cheese fail. I decided to try a vegan recipe for lasagne swirls with tofu ricotta cheese. I have been experimenting with adding more tofu to our diet. I should have known, however, to just stop right there and go with real cheese when the tofu cheese recipe called for tahini. I like hummus, but the sesame taste is just wrong for an Italian dish and too foreign for little boy tongues. The eldest took one bite and declared, "Mom, I don't like this." He dutifully ate his and excused himself from the table, making barfing noises along the way. The littlest cautiously tasted his portion, screwed his little face into a look that said, "There is no way I'm gonna eat that crap, Mom!" OK, I hope my little one doesn't ever use the word crap, but the poor guy was not happy about the flavor explosion in his mouth. He gave it a valiant try and resorted to eating plain noodles left over in the pan. As for me, I didn't find it repulsive, but I did find myself longing for the creamy gooeyness of real cheese. As you can see from the photo above, it looks innocent enough, but don't let looks fool you.

However, out of failure comes success. I am super excited to be sending out a special mailing to my photography clients and to make it really special, the boys and I headed to Office Depot to look for some nice envelopes. No go. Well, Micheal's was next door, so of we went. Turns out they are closing this particular location and I couldn't find what I wanted there either.

While passing through the wood craft isle, the little one got himself worked up over those large wooden letters they sell. I picked out B-E-N and showed him how they spelled his name. He clutched the letters to his little chest like a cherished treasure. I really didn't want to spend $12 on three letters from the alphabet. I really thought it would be a good thing to take advantage of his eagerness to learn his letters, though. I'd been meaning to make him a set of Montessori inspired sand paper letters but, well, add it to the list.


Big brother came to the rescue. He lead us two isles over, where we discovered a whole bag of little wooden letters, the entire alphabet and a few extras thrown in, for the price of one of the big ones. Meanwhile, the little guy was filling the cart with overpriced wooden numbers. Somehow I convinced him to give up the numbers for the bag of letters and away we went.


This evening, while Momma was ruining dinner, I set the little one up at the kitchen counter with paint and wooden letters. As he painted each letter, he named the one's he recognized and I helped him with the rest. We sounded out each letter and came up with words that began with those sounds. Now he has beautifully painted letters to use for letter recognition and spelling simple words. Pick up a batch for a reasonably priced learning aide for your little learner that provides a more tactile approach than plain old flash cards. Put them in a nice little box with a handle, and they even become portable.


Friday, June 15, 2012

Homemade Flour Tortillas Without Lard


I have lived in Texas for nearly 14 years and never made tortillas from scratch until a couple days ago. It's just so easy to throw a pack of 20 into the cart at the grocery. And I must confess, I grew up in Ohio where the only "Mexican" cuisine to be had was Taco Bell or for a homemade cultural experience, hard shells filled with greasy ground beef seasoned with a mysterious flavor packet from a box (ick). And tor-tee-ya was pronounced tor-till-a. I thought there must be something difficult about making them from scratch. I am a true Texas convert now. The boys and I will only eat homemade from now on. They are easy, though perhaps a little time consuming, and much better than store bought. I think next time I will get the boys involved. It would be a great family activity.

I used the left over broth from boiling the tofu cutlets to cook up a batch of black beans, adding a bit of garlic, cumin, pepper, thyme, and salt to season them. The black beans made a perfect filling for the fresh tortillas. No one complained when we had leftovers the next night. In fact, my oldest son had so many compliments for the chef this momma was beaming.

Put on your apron, pull out the flour, and make up a batch of tor-tee-ya's tonight.

Homemade Tortillas

3 cups unbleached flour
1 tsp salt
1/2 tsp baking powder
1/3 cup canola oil
1 cup hot water

Mix the flour, salt, and baking powder together thoroughly. Add the oil and mix with your hands until the flour mixture resembles fine crumbs. Add hot water and mix until a ball is formed. Cover and let the dough rest for at least 30 minutes. (If leaving overnight, place in refrigerator)

Divide dough into 12 even sized balls and roll out one at a time on a floured surface. Brush off excess flour and cook on a hot, ungreased griddle (I love my cast iron) over medium high heat. Turn the tortilla when brown blisters form. Serve warm.


Monday, June 11, 2012

Homemade Blackberry Ice Cream

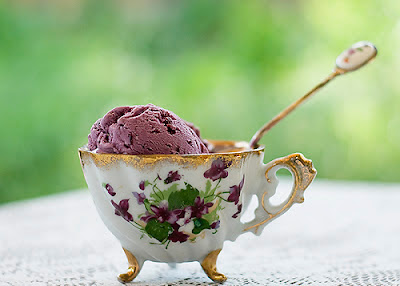
Yesterday I dusted off the ice cream maker to make our first batch of ice cream for the summer. Since we had blackberries on hand from last week's trip to Green Country Farms it was perfect to use them up in a batch of ice cream. Ah, what a little bit of heaven for the taste buds! If we had this sitting in the freezer all the time I'd probably gain 20 pounds! My oldest son is already asking me to make another batch sometime and we still have plenty left from this one. But I hear the peaches have already shown up in the farmer's market and fresh peach ice cream also sounds like a piece of summertime heaven to me. We have one more batch of blackberries in the freezer, so I am sure we will be having another batch of blackberry ice cream before the summer is over.

I keep thinking about Ohio and Mom and Dad. I would love for the boys to go berry picking with their Papaw, and then we could whip up a batch of ice cream to share on their back porch while listening to the sounds of a summer evening. Maybe the boys could even help Dad make a batch of blackberry jam to take home with us so we could savor our visit long after we return home. But, sadly, it doesn't look like a trip to Ohio is in the cards anytime soon. 

Blackberry Ice Cream

3 cups blackberries
1 14 oz. can sweetened condensed milk
2 1/4 cups half and half
1 vanilla bean or 2 tsp vanilla extract

Place berries in a food processor bowl and puree. If desired, run berry mixture through cheesecloth to remove seeds (recommended). Set aside. 

In large bowl, combine sweetened condensed milk and half and half. If using, split vanilla bean in half and scrape seeds into mixture. If not, add vanilla extract and mix well. Stir in berries and pour into ice cream maker. Freeze according to manufacturer's directions.

Saturday, June 9, 2012

Tofu Cutlets Using Frozen Tofu

In an attempt to eat less meat, I have been trying tofu recipes on the boys. My first attempt at feeding them tofu was nothing extraordinary. In fact, my oldest would agree it was quite bland. Running low on groceries and wondering what to do with the block of tofu in the freezer, I did what any modern hippy would do...I googled it. After reading several ways to prepare frozen tofu I ventured into the kitchen to cook up some tofu cutlets. The boys wolfed them down, even Mr. Picky, my three year old. And I wholeheartedly agree they are delicious. So far, this is my favorite way to prepare tofu, even though it takes a couple of steps. Next time I think I'll try these with some barbeque dipping sauce on the side and maybe add a little garlic to the broth.

It is recommended that the tofu is removed from the package and the water drained from it before freezing, but I just stuck the whole thing in the freezer. Apparently draining the water from the tofu before freezing results in a less watery final product. Also good to know, if you have never frozen tofu before, the texture and color changes. It develops a yellow tint and a texture that makes it more "meat like".

Tofu Cutlets

1 frozen package good quality tofu (do not thaw)
2 cups vegetable broth
1-2 Tbsp soy sauce or Bragg's Liquid Amino
about 1 cup unbleached flour
salt and pepper to taste
oil for frying

Add broth and soy sauce or Bragg's in a medium saucepan. Set block of frozen tofu in pan and thaw in broth mixture over medium heat, turning tofu occasionally if broth does not cover. Remove tofu from broth when thawed thoroughly and slice into 1/2 inch thick cutlets. Cover bottom of skillet with a generous amount of oil and heat on medium heat. Dredge cutlets in flour seasoned with salt and pepper. Fry in oil until both sides are golden brown. Serve hot.

*Note - the left over broth may be used as a base for other dishes. Add a couple garlic cloves to the broth and cook up a batch of black beans or maybe use as the beginnings of a nice vegetable soup.

Monday, June 4, 2012

Blackberry Cobbler and A Day in The Country

The best days for me anymore occur when the boys and I are creating new memories in places not associated with the good ole' days. We did just that on Sunday when we ventured out of town to Green Country Farm near Floresville, Texas and spend a quiet overcast afternoon picking organic blackberries. The boys had a blast. The little one took his job of pulling the wagon around quite seriously and his older brother turned it into the search for the biggest, juiciest berries he could find. I was quite amazed, and surprised, at how delicately my three year old handled the berries. I really was expecting a whole lot of squished berries. I was also expecting some covert snacking, but I didn't catch any of that either.

I, of course, brought my camera along to capture a few photos from our afternoon. So in between chasing down Ben with the wagon and picking berries I got a few pics of my city boys enjoying their day in the country.

Mr. Pullin, the gentleman who owns the farm, sent us away with four ears of freshly picked corn and a handful of figs as well. I wish I had captured a pic of him leading the boys out to the field of corn to give the oldest a lesson on how to tell if its ready to pick, but I had already put my camera back into the car.

Tonight I took some of our delicious berries and made cobbler. Oh, my, we were in heaven when that first bite touched our lips! We ate the corn tonight too. The little one had never eaten corn on the cob before and didn't quite know how to handle it. Thomas, on the other hand, was horrified to find a worm in each ear when he cleaned it. I don't know about you but I'd rather pick out a little worm than deal with all the pesticides it would take to kill it.

And here it is. The recipe for blackberry cobbler. Summer is officially here!

Blackberry Cobbler

4 cups blackberries
1 Tbsp lemon juice
1 large egg
1 cup sugar 
1 cup unbleached all purpose flour
6 Tbsp butter, melted

Preheat oven to 375 degrees. Place blackberries in a lightly greased 8x8 inch baking dish, sprinkle with lemon juice. Stir together egg, sugar, and flour until mixture resembles a course meal. Sprinkle evenly over fruit. Drizzle melted butter over topping. Bake for 35 minutes, or until light brown and bubbly. Let stand 10 minutes. Serve with a scoop of homemade vanilla ice cream or whipped topping, if desired.

Wednesday, May 30, 2012

My Son's Refrigerator Pickles

My space saver cucumber plant has turned into a prolific monster. Yesterday we were excited to pick our first homegrown cucumber off its vine.Wanting to do something special with it and also having an overabundance of dill growing in the garden, I pulled out my recipe for refrigerator pickles. I have fond memories of Mom making these easy pickles when I was a kid. She also canned dill and bread and butter pickles when she had a larger batch of cucumbers to use up, but refrigerator pickles always remind me of carefree summers and her big beautiful gardens.

While I was cooking dinner last night, my 12 year old took charge of the pickle making. Little brother "helped" too by pouring the measured vinegar and water into the pan. The slicing, boiling the vinegar mixture, preparing the garlic and dill were all taken care of by Thomas. The only part I had in making the pickles was pouring the hot liquid into the jar and photographing the finished product. I love moments like that where we are all working in our tiny kitchen together. And I love that my boys are learning life lessons that will take them beyond the kitchen and into the big wide world as adults.


Refrigerator Pickles

(makes one jar)

1 large cucumber
3/4 cups water
1/2 cup apple cider vinegar
1 1/2 tsp sea salt
several sprigs fresh dill
2 garlic cloves, peeled and crushed
1 tsp peppercorns

Add water, vinegar, and salt to a saucepan and bring to a boil. Wash and slice the cucumber. Fill a jar with garlic, peppercorns, fresh dill, and cucumber slices. Pour vinegar solution into jar, filling up to about 1/4 inch from the top. Place lid on jar, cool, then refrigerate for at least 24 hours.


Monday, May 28, 2012

Barley Salad with Lemon and Herbs

I had never really eaten barley other than in soup before I tried this recipe. It is an adaptation of a recipe from the cookbook, Clean Food by Terry Walters. Barley is a great food for reducing cholesterol, is easy to digest, and helps detox the liver. While I used pearl barley because it is what I had on hand, just as with any other grain, whole barley is superior to pearl barley because it is minimally processed and more of the nutritional value remains available. This salad makes a great stand alone vegetarian meal on a hot summer day or a great side to a family picnic.


Barley Salad with Lemon and Herbs

1 cup whole or pearl barley
2 1/4 cups vegetable stock
2 green onions, sliced
1/2 to 1 cup diced tomato
1/4 cup sliced Kalamata olives

dressing
1/4 cup extra virgin olive oil
1/4 cup fresh lemon juice
1 clove minced garlic
1 Tbsp chopped fresh basil
1/2 tsp minced fresh rosemary
1 tbsp fresh thyme leaves
sea salt and freshly ground pepper to taste

Soak barley in water for at least 1 hour. Drain and cook with stock until tender and liquid is absorbed. While barley is cooking, whisk together dressing ingredients. Remove cooked barley, fluff with a fork, and put into a large serving bowl. Add diced tomato, green onion slices, and olives. Coat with dressing and refrigerate in covered bowl until cool.

Sunday, May 27, 2012

Homemade Popsicles!


Now that the south Texas heat has started to climb the boys and I have been making popsicles to keep cool. Although I don't normal push specific brands or products, I am going to put in a little plug for the new Silk Fruit and Protein drink. It turns out they make yummy and embarrassingly easy popsicles. We tried the peach mango and the boys loved them. The little one, who has figured out he is strong enough to open the freezer door, tried to help himself to seconds. He came into my office holding the popsicle mold out to me and asking me for "more popskicle, Momma." I love the way little people speak.

If you go to the Silk web site right now they have a coupon you can use off one purchase (thought you have to sign up for their newsletter) Silk Fruit and Protein Coupon


Yesterday the little and I made strawberry yogurt pops. The boys love Jala frozen yogurt bars, but they are expensive so I came up with our own. They are only slightly more complicated than pouring Silk Fruit and Protein into popsicle molds.


Strawberry Yogurt Pops

1 cup strawberry or vanilla Greek yogurt (I used The Greek Gods Honey Strawberry)
1 scant cup strawberries, cut into small pieces
1/4 cup vanilla almond milk

Mix almond milk and yogurt together. Add in strawberry pieces. Lightly grease popsicle molds with coconut oil to make it easier to get pops out of mold. Pour liquid into popsicle molds and freeze until solid. 


Saturday, May 26, 2012

Warm Cinnamon Pancakes


As you can tell by my overabundance of breakfast recipes, we love breakfast around here. Heck, sometimes we even eat pancakes or waffles for dinner. On lazy Saturday mornings like this one, sometimes we don't even get it on the table until nearly lunch time. We especially eat a lot of pancakes around here. None of us are particularly gluten intolerant, so I don't avoid wheat flours or other gluten products, but I think it is healthy to mix it up a bit and introduce other grains into our diet. This pancake is made from a mix of wheat and brown rice flour. Brown rice flour is a tasty, light flour that makes a good substitute in recipes where you want the results to be less dense. My little one gobbled up these pancakes, so if you are looking for yummy kid tested breakfasts this one fits the bill. These are especially yummy topped with apple butter instead of syrup. Or for a variation, try adding dice apple right into the batter.


Warm Cinnamon Pancakes

1/2 cup brown rice flour
1/2 cup unbleached all purpose flour
2 tsp aluminum free baking powder
1/4 tsp salt
1 tsp. cinnamon
1/4 tsp. nutmeg
1 egg, beaten
1 cup milk
1 Tbsp coconut oil
1 Tbsp. honey

Combine dry ingredients in large bowl until mixed well. In a separate bowl, combine all wet ingredients. Mix well. Stir wet ingredients into flour mixture. Batter will be slightly lumpy. Heat lightly oiled griddle or frying pan (my favorite is my cast iron). Pour approximately 2 Tbsp. batter into griddle for each pancake. Cook until bubbly, then flip and cook other side until golden brown. Serve hot. 


Tuesday, May 15, 2012

Grilled Ham and Cheese Sandwiches with Raspberry Chipotle Sauce


The boys and I have been eating more vegetarian meals the past two months for health and money reasons, but sometimes a girl has gotta have her indulgences. I fashioned this hearty sandwich after one on the menu at a little farm to market restaurant downtown. I'm not even sure the restaurant is there anymore, but this sandwich had a lasting impression. It is one of my 12 year old's favorites, with just the right amount of sweet heat from the sauce. It has enough flavor to appeal to the adults as well. Serve it up with sweet potato fries or a side of beans and you have a tasty summer meal.


Grilled Ham and Cheese Sandwiches with Raspberry Chipotle Sauce

A loaf of sourdough bread, sliced
Good quality ham sandwich slices
Medium cheddar slices
Raspberry chipotle sauce, any brand
A sweet onion cut in thin sliced rounds
Unsalted butter

Saute desired amount of onion in generous heap of butter until golden brown. I use about a half an onion for four people. In a large skillet, melt about a tablespoon of butter. Layer a slice of sourdough bread with ham slices and sauteed onion. Pour a couple tablespoons chipotle sauce evenly over everything and top with cheese and another slice of bread. I usually butter the outsides of the bread as well, then place in heated skillet. Grill both sides until golden brown. Repeat for each sandwich you desire to make. Serve immediately.


Tuesday, May 8, 2012

Easy Cinnamon Rolls

I confess. I am an impatient person. I have never been able to make yeast based breads and pastries for my lack of patience in waiting for the yeast to do its thing. I get in a hurry. I don't want to go off for two hours and do something else while the yeast bubbles and rises. I want to flow from one step to another until I have my goodies baking in the oven, the pleasant scent wafting through the kitchen. That is why I love this recipe. No yeast involved and it is super easy, not to mention quick to make. In my opinion they taste just like the yeast variety and my kids still haven't figured out the secret ingredient that gives them the soft, yummy texture.

Disclaimer: These are old photos done in poor lighting. I think the next time I make up another batch I am going to get some better photos!!


Easy Cinnamon Rolls

Dough:
3/4 cup Cottage Cheese (4% milk fat)
1/3 cup Buttermilk
1/4 cup Granulated Sugar
4 Tbsp melted butter (unsalted)
1 tsp vanilla extract
2 cups Unbleached Flour
1 Tbsp baking powder
1/2 tsp Salt
1/4 tsp Baking Soda

Filling:
1 1/2 Tbsp melted butter (unsalted)
2/3 cup Packed Brown Sugar
1 1/2 tsp Cinnamon
1/2 tsp allspice
1/4 tsp cloves
1 cup Chopped Pecans

Glaze:
2/3 cup Confectioner's Sugar
2-3 Tbsp Milk
1 tsp Vanilla Extract 

Heat oven to 400 degrees f. Grease the sides and bottom of a 9 or 10 inch spring form pan.

In a food processor, mix first five ingredients together until smooth (about 10 seconds). Add remaining ingredients for dough and pulse in short bursts just until dough clumps together, careful to not over process. Dough will be soft and moist.

Scrape dough out onto floured surface and knead with floured hands until smooth. Roll dough into a 12x15 inch triangle.

Brush the dough with the melted butter for filling, leaving a 1/2 inch border around edges. Combine brown sugar, spices, and pecans. Sprinkle evenly over buttered dough.

Starting at long edge, roll the dough up jelly roll style. Pinch at seams to seal and leave ends open. Cut roll into 12 equal pieces with a sharp knife. Set the pieces cut side up in prepared pan. They should touch slightly.

Bake until golden brown, about 20-28 minutes. Set on wire rack to cool. Meanwhile, mix confectioner's sugar, 2 Tbsp milk, and vanilla extract in a small bowl to make a smooth glaze, thick but pourable. Add 1 Tbsp more milk if needed. Remove rolls from pan and transfer to serving plate. Drizzle glaze over rolls and let stand 15 minutes before serving.